Thursday, May 30, 2013

Starfish earrings

These are the second pair of earrings I made for my shop. They're made from a silver plated starfish charm, silver plated copper wire and a shiny blue glass bead. I twisted the wire on both ends of the beads in a circular patter in an effort to mimic the way waves look as they crash into the shore. I mention that the beads are shiny, because that's what drew me to these beads in the first place. Every time my mom and I go in to the bead section at Michael's at least one of us ends up saying 'oo shinny'. Usually both of us, we're like crows
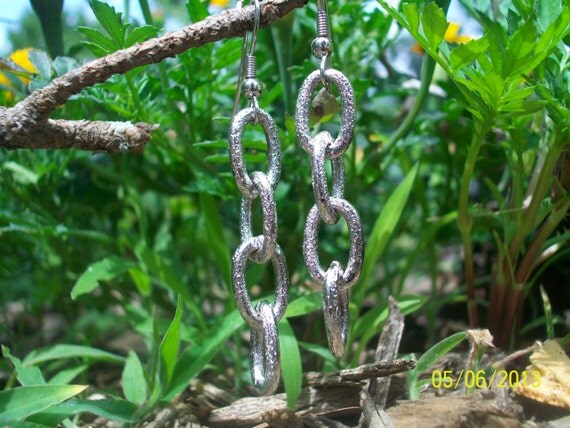
like that.
 
   I think these are great earrings for summer, especially with the nautical look being so 'in' this year. As I believe I've mentioned before, I like the nautical look; even more so when it leans more towards the pirate look. Which is why I most often were these earrings with my Silver chain choker with an anchor clasp and my Skull and Crossbones Spike Ear Cuff.    

 They cost $12.00 plus $2.50 shipping. I'm sorry but I don't ship jewelry outside the USA. Here is a link to the ad: https://www.etsy.com/listing/114110452/starfish-earrings
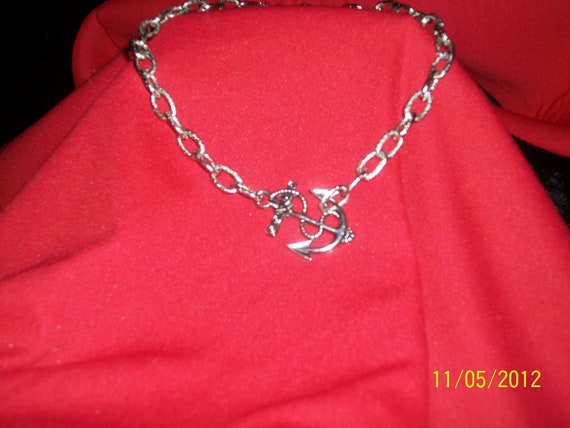
Click here for my Silver chain choker with an anchor clasp necklace Which costs $13 plus $2.50 shipping: https://www.etsy.com/listing/114053179/silver-chain-choker-with-an-anchor-clasp?ref=shop_home_active
My Skull and crossbones spike ear cuff costs $12. plus 2.25 for shipping.
https://www.etsy.com/listing/125533489/skull-and-crossbones-spike-ear-cuff


            Thank you for reading Bats Bizarre's official blog. Have a bat-tastic day!

Tuesday, May 28, 2013

Hummingbird Cake

  I made this cake last weekend (for Memorial Day I told myself). I got the recipe out of a book called "Derrick Delights".
   It didn't say what size pans to use. I used 8'' pans and took about 35 to 40 minutes instead of the 25 to 30 it said it would, so I'm guessing I was supposed to use 9''. Oh well, it's not like I have three 9" cake pans anyway. It also didn't have a recipe for the cream cheese frosting, so I used the one from my favorite Italian Cream Cake recipe. There is a printer friendly version at the end. I hope it works. It's my first time trying to make one.

                                                       Hummingbird Cake

3 cups flour                            1 cup salad oil
2 cups sugar                           1 1/2 tsp. vanilla extract
1 tsp. salt                               1 8 1/4oz. can crushed pineapple. (I used heavy syrup. 8oz. works fine)   
1 tsp. cinnamon                     1 cup chopped pecans
1 tsp. baking soda                  2 diced bananas
3 eggs


  Combine dry ingredients . Mix with eggs and oil until well moistened. Do not overbeat. Stir in vanilla, pineapple (I put the juice in too), pecans, and bananas (feel free to mush some of the bananas into the batter). Pour batter into 3 well greased and floured 9" cake pans and bake for 25 to 30 minutes at 350. Cool in cake pans 10 minutes. Remove and cool on rack thoroughly. (Be sure to do this or your cake may be too moist.)


I never liked cream cheese frosting until I started using 33% less fat Neufchatel cheese. It was too rich. I'd often get sick eating it. I was a little leery of trying it low fat cream cheese at first. Low fat, low taste, right? But this stuff is fantastic! I like to buy several packs when it goes on sale and leave them in the freezer until I want to use it. If you're going to make it into frosting you have to be sure it is completely thawed or else it won't fluff properly, but other than that it work out great. 


                                                     Cream Cheese frosting

1 8oz package cream cheese              1 cup chopped pecans
1 stick butter                                       1 cup flaked coconut 
1 box powder sugar
1 tsp. vanilla

Beat cream cheese and butter. Add powder sugar (a little at a time until desired taste and consistency are reached). Mix in vanilla. Stir in pecans and coconut. Spread on cooled cake.

Printer friendly version here: https://docs.google.com/document/d/1H92O7DRSAtbW2g5FVsGpCW6T-Z0b-QJjehTTMiBBgmc/edit?usp=sharing

                       Thank you for reading Bats Bizarre's official blog have a bat-tastic day!


Thursday, May 23, 2013

Gigantic snake

  "It looks like some Mockers are fighting a Blue Jay in the front yard." Mom said last Tuesday afternoon as she looked out the front window. "Oh, two Blue Jays."
   I looked out the window to see five Mockingbirds and two Blue Jays screaming and dive bombing something next to the front steps. I see a flash of white and ice formed in my stomach. Hoping I'm wrong I grab the binoculars we keep by the window for bird watching. "Shit, there's a huge snake there." (there were a lot of swears in there originally)
  "I'll go get the shovel." I shout running out the back door. I'd like to be able to say my thoughts, as I ran full out to the barn were of the danger the snake posed to the chicks or that crazy cat Blaze who had been stalking up to the snake, her tail twitching with annoyance, but for the most part my thoughts were just a hysterical repetition of 'Snake!' and 'Shovel! Get the shovel.' I'm not good with snakes, they scare the daylights out of me.
   It was over six foot long! I looked it up in 'Texas Snakes: a field guide' by James R. Dixon and John E. Werler, (it was the first snake I've looked up that looked exactly like the pictures.) It was a Rat Snake which makes sense since according to the book their favorite foods are birds and their eggs and they often climb trees to eat them.
   That's a terrifying thought, finding a snake that size right at home slithering around in a tree, especially with some of the trees needing trimming. This snake might have just finished raiding a nest. So, if you see a bunch of birds causing a ruckus in your yard it might be a snake and a giant one at that.      
 
Use coupon code MEMORIALDAY for 10% off your Bats Bizarre purchase. Coupon expires 5/28/13 and doesn't include the price of shipping.

                     Thank you for reading Bats Bizarre's official blog. Have a bat-tastic day!  

Tuesday, May 21, 2013

Three little hatchlings

   As you might have guessed from the title of this post three of the eggs hatched. We might have had four, but the first little chick fell out of the nest at some point after we checked that day and Mohawk hopped out to sit on her (hopefully a her), and apparently it long enough between her hopping off and mom and me checking on them for the other chick, who had only chipped a small hole in her egg, to catch a draft, because she didn't make it out of the egg.

  3 out of 8 isn't the best results, but we were a little haphazard about putting eggs under Mohawk. Truthfully, we didn't think she'd see it all the way through. So, we ended up with eggs due to hatch a week apart. Oops. And we probably shouldn't have left her in the henhouse. Next time were going to be more careful, put all the eggs under her one day, and move her to the brooder house that day.

  But on a lighter note These are some cute chicks. As you can see two of them are black with white/pale yellow spots. The larger one is the oldest who we are calling handful. She barely has any white on her, just a triangular bib and a white butt. She runs circles around Mohawk and likes to sit on her back, sometimes she hitches a ride on Mohawk's back when she is walking around.

  The little brown one (we call her a calico) is the second hatched. She came out of a blue egg so she is one of the Ameraucana girl's. She is more sedate and if you look closely looks like Grandpa Munster or a opossum. We call her Grandma Munster and sometime 'possum. She only sits on Mohawk when she's sitting down so; far hence the more sedate.


  The youngest has the most white on her and has those cute fluffy Ameraucana cheeks; which makes her head look gigantic. She hatched last Saturday and seems kind of slow, but that's probably because we're comparing her to chicks that are much older. So far we're calling her 'little bit'.

Mohawk did not like the camera one bit, and ended up attacking it. By the way Bats Bizarre is having a Memorial Day sale. Use coupon code MEMORIALDAY for 10% off your purchase. Discount  doesn't include shipping cost.
     
       Thank you for reading Bats Bizarre's official blog. Have a bat-tastic day!


Thursday, May 16, 2013

Getting your flock though a sizzling summer

    It's summer which means thermometers around the country are hitting the ninety degree marks. (and higher.) So I thought for today I'd talk about ways to help your chickens beat the summer heat.  
  Two years ago we last nearly half our flock within three days to heat stroke. We developed a cooling regimen and after implementing it didn't lose a single hen. It's pretty much the same thing other people are advising, but the more people talk about it the easier it is for people to find this life saving advice. So here's what Mom and I do when the temperature rises into the 90s and above.

  The first part of the process is: ice. Lots of ice. 
-Put ice cubes in their water.
-Hang plastic grocery bags filled with ice in your chicken house. Especially around the nest boxes.
-Save your empty milk cartons. Fill about half way with water, leave in freezer until completely frozen, and place in chicken house.
-Put those ice pack you get with some coolers in your chicken house.

Water
-Make sure they have lots of water. Some people advise putting electrolytes in their water, too.
-Spray your chicken house and the area around it with water.
-If one of them looks very distressed, wet its feet. Doing that actually saved one of the girls.

Cooling stations
-Put boards, we used 1/2 plywood, at an angle against your chicken house so your chickens can get in the shade and still catch a breeze.
-Spray the plywood and the dirt under it with water.
-Scatter ice under the boards.

Treats
-Give them frozen bread
-Freeze kitchen scraps the night before.  

Check them often. Especially in the hottest part of the day.

                   Thank you for reading Bats Bizarre's official blog. Have a bat-tastic day!

Tuesday, May 14, 2013

Bearded Iris

Five years ago I bought some 'Black Bearded Iris'. They have not bloomed once. They looked healthy and multiplied like crazy, but no blooms. Every year my hopes would rise; 'Surely, this will be the year.' I'd think. One would produce a long fat leaf. 'Yes this is it, it's going to flower!' I exclaim.

  And finally, after a few days that-felt-like-weeks it would open- into several sword-like leaves.  I never lost hope, but I did begin to get the feeling the bulbs were mocking me.

  Well, no longer. One of them bloomed today. There are even two little buds with tiny black petals sticking out along the flower stem. Some of the other bulbs look like they are going to flower as well.


                                   I still don't know why they didn't flower for all that time...


                Thank you for reading Bats Bizarre's official blog. Have a bat-tastic day!

Thursday, May 9, 2013

Photography

 I've started taking my product listing pictures outside. I used to take them on an end table in the living room (the only place in the house that gets direct sun for any amount of time), but thanks to the trees leafing out, that amount of time is so short it's barely calculable. Without di
rect sunlight colors tend to be off and metal, and sometimes fabric, items are either too dark to make out or they reflect the camera flash so badly you can't make out any details.

 After a several bad quality photos I would often get frustrated and take pictures of the item in my hand while I stood out in the yard away from the trees. Hence the calla lily earrings' product picture.

  The other day I thought to myself, 'This is stupid. Why don't I start out outside?' And from there it kind of snowballed into me using garden plants as a backdrop instead of the scrap fabric I usually use. I didn't have any new items to try this plan on, but I did have a few pieces who's photos where pretty bad.
  You couldn't really make out my Chain Earrings. The Red Scorpio choker's pictures showed it in two different shades of red. And the main photo of my Sleet Earrings was horribly blurry. So, I decided to try it out on them. It worked out pretty well once I figured out that you need
a somewhat solid background to really show off the items. I'm probably going to take all my photo's out side from now on. Plus it's fun to be outside! Lobo enjoyed it as well.

                  Thank you for reading Bats Bizarre's official blog. Have a bat-tastic day!


Tuesday, May 7, 2013

Paper towel seedlings

Just a quick update today.

  I told you a couple of seedling come up when I tried growing catnip seeds in a moist paper towel after a few attempts to grow anything other than weeds with the normal sew seeds in dirt method failed.
 Well, I'm pretty sure I killed them all. A couple of weeks ago the two oldest sprouts started withering So I tried planting the seeds. It did not go well. The tops stuck to my fingers and the roots stuck to the paper towel resulting in seedling that where torn in half, like victims of some horrible witch-hunt.

I reseeded in dirt the other day. Here's hoping for better results.

There's than a week left of Bats Bizarre's Mother's Day sale. Use coupon code MOTHERSDAY before 5/12/13 for 5% off your entire purchase. Discount doesn't include shipping. Here's a link to my shop page https://www.etsy.com/shop/BatsBizarre?ref=si_shop
     

        Thank you for reading Bats Bizarre's official blog. Have a bat-tastic day!   

Thursday, May 2, 2013

Fantastic Cheese Enchiladas / Happy Cinco de Mayo


   Happy Cinco de Mayo! This is a recipe for great restaurant style Tex-Mex Enchiladas. Be forewarned, this is not diet food and is addictive. Also it is a lot easier to make if there are more than one person  working in kitchen, mom and I make them  together. 

You can also add already cooked chicken, or spinach. We add spinach and kale to the cheese. And kale on top. I don't know what happened to the photos with the kale on top.


Here is a link to a printer friendly version: https://docs.google.com/document/d/1LCS_etHQCnSad0Un9fWsw70okdQWpvG9MAvPfsjm_QI/edit?usp=sharing

   First make the gravy.

Chili Gravy

1/4 c. oil                          1tsp. salt
1/4 c. flour                       1/2tsp. pepper
2T. chili powder              1/2tsp. oregano
2tsp. cumin                      2c. chicken broth or vegetable broth (if you want)
1/2tsp. garlic powder       2T. tomato paste

   Heat the oil and flour, stirring constantly, until you have a light brown roux. Add chili powder, cumin, garlic powder, salt, pepper, and oregano. Cook for a minute. Add broth and tomato paste, stir until thicken into a sauce.

Then make the Enchiladas.

Cheese Enchiladas  (quantities depend upon how many enchiladas you plan on making)

Yellow corn tortillas                                                  Half a yellow onion, chopped  (optional)    
Half a loaf of Processed Cheese cubed           One green onion, chopped (also optional)
Chili gravy                                                     Shredded Cheddar and Monterey Jack cheese                                                                                        

Dip a tortilla in hot oil, just a minute or so to soften them up and get the water out. Place some chopped onion and about 6 cubes of processed cheese in a line on a tortilla. Roll the tortilla around the filling and place in the baking dish. Repeat until the dish is filled or the desired numbers of enchiladas is reached. Cover with chili gravy, shredded cheese, and chopped green onion. Bake at 350 until the cheese bubbles. Enjoy.


I told you this isn't diet food. I guess you could bake the tortillas, but that usually results in burned tortilla chips in this house. Or maybe microwave them, since you're really just getting the frost out and softening the tortillas when you fry them.
          
                 Thank you for reading Bats Bizarre's official blog. Have a bat-tastic day!